Showing posts with label handmade. Show all posts

Friday, 25 March 2011

spring quilt tutorial

I have wanted to make a quilt for a while. This is my first attempt, and I am by no means an expert, but I thought it might be useful to document each stage for a tutorial, just incase anyone else fancies having a go!

To make a quilt measuring 136cm x 160cm, you will need:
16 fat quarters of coordinating patchwork fabric
cotton for your backing 140cm x 165cm (I used a single flat sheet)
batting 140cm x 165cm
thread and pins

I bought my fabrics here and here, and I was really surprised by how quickly they were posted, I think both came the next day! I used a batting made from recyled bottles, which I bought here.

Step 1
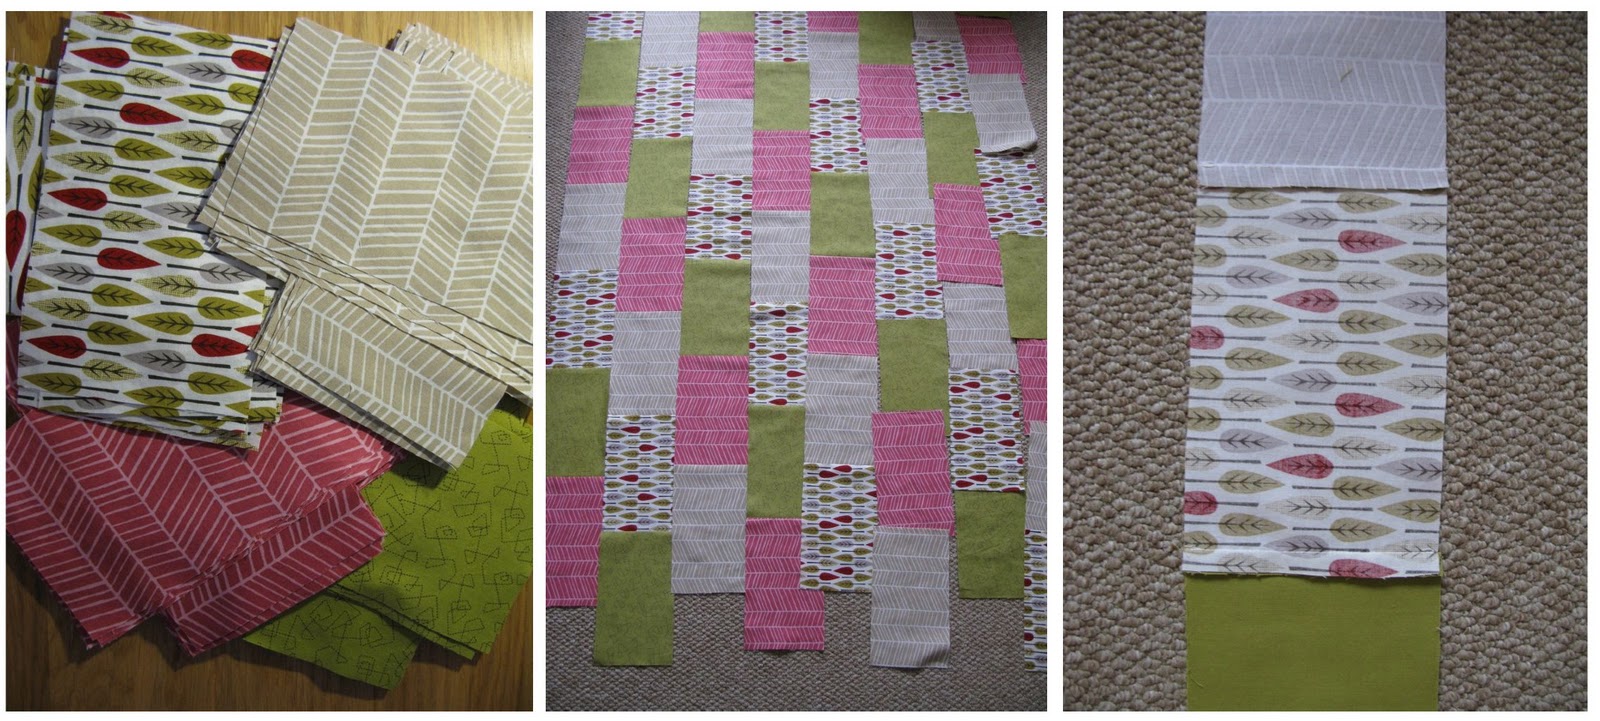
Cut a paper template measuring 12cm by 20cm. Use your template to cut out 133 rectangles. I drew my design on paper first, so knew how many of each fabric to cut. Lay your rectangles out on a flat surface to make sure you are happy with your design. You will have 7 rows of 9 blocks and 7 rows of 10 blocks.

Step 2
Using a 1cm seam allowance, stitch the blocks in the 1st vertical row together. Press all seams towards the bottom of the row. Repeat with the remainder of the vertical rows. Then join the horizontal rows together using a 1cm seam allowance, offsetting as shown in the photo. Press all seams to one side once all rows are attached. Trim the top and bottom of the quilt to form a rectangle.
Step 3
Lay the batting on a flat surface, and then lay the backing fabric on top. Next lay the completed quilt top with the right side facing the backing. Pin around the edge and trim the backing and batting to the size of the quilt top. Using a 1cm seam allowance, stitch all 3 layers together, leaving a 20cm opening on one side for turning the quilt right side out.
Step 4
Turn the quilt right side out through the opening. Iron the opening inwards, and slipstitch the gap closed.

Step 5
Pin at the corner of each rectangle (making sure to pin through all 3 layers), working from the middle outwards to hold the layers in place. Quilt on the edge of each vertical row working from the top to bottom, and finish each row by pulling the thread through to the back and neatly knotting.

Tuesday, 15 March 2011

orla cushion covers

Finally managed to get around to making the Orla cushion covers for our sofa :)

Friday, 11 March 2011

pincushion added to etsy store

I just added this cute pincushion to the etsy store, using some Orla Kiely flower print. Perfect for keeping your pins and needles in check!

Thursday, 10 March 2011

Tuesday, 8 March 2011

lavender sachets

I have added some lavender sachets to my shop, made from French lavender and japanese linen. Available here.

Friday, 4 March 2011

etsy treasury

My home cushion was picked and featured in this lovely treasury today. I really like the brooch and sewing box featured. You can see the cushion in my etsy shop here.

Tuesday, 1 March 2011

little red riding hood pin cushion

A cute little pin cushion, with Little Red Riding Hood japanese zakka ribbon, available here.

Wednesday, 23 February 2011

little red riding hood storage box added to shop

A little fabric storage box handmade by me from cotton and Japanese zakka ribbon, depicting Little Red Riding Hood... so cute! Available here.

Thursday, 17 February 2011

new fabric delivery

I received a delivery of Japanese linens today, I'll be working at turning them into new items for my etsy shop.

Tuesday, 15 February 2011

etsy treasury

My striped tea cosy was picked and featured in this lovely etsy treasury :) You can view the tea cosy in my etsy shop here.

Tuesday, 8 February 2011

rustic striped tea cosy


Today I added a striped tea cosy to my shop, it has a lovely rustic feel. I had fun taking the photos too, using some wooden letter tiles from an old board game called 'Ad-Lib' I found in a charity shop last weekend.

Friday, 4 February 2011

new cushion design in etsy shop


I've added a couple of new cushion designs to my etsy shop over the past couple of days. LOVE and HOME are both available in 14 colour combinations.

Thursday, 3 February 2011

welcome to my new blog!


welcome to my blog! here I'll be posting info about my company e17craft, and any other bits and bobs I fancy :)
Related Posts Plugin for WordPress, Blogger...